Once you have decided to contribute to the project, we need to go over some rules and guidelines before you can start. These rules and guidelines help us work together as a team and give us a common set of directions that keep us all on the same page. In the case of any disagreements on what needs to be done, we can always refer to the guidelines to help us find our way from disagreement to consensus.
Before We Start
This document strives to provide a solid path through contributing a change to Elegant, from setting up your environment to submitting and responding to a Pull Request.
To stay focused on that solid path, additional information that is typically needed to provide a complete picture of the topic being discussed will be presented in other articles and linked to from this article.
Please take the time to familiarize yourself with the information in the attached articles, as they will help you build a complete understanding of our entire contribution process.
Getting The Big Rule Out of the Way
As the project is an open source project, anything you contribute to the project is covered by the project’s Contributions License. If you are not willing or unable to abide by those licenses, we cannot have you contribute to the project.
Primary Goal
The primary goal of this project is to provide a theme for Pelican that provides the Elegant Look and Feel to our user’s websites. To that end, any features or changes must:
- not negatively effect readability and reading experience
- not cause distraction for the reader
- any changes must work out of the box with sensible defaults for the user
These are not negotiable.
Developing Changes Locally
The Elegant project is hosted in GitHub and requires your machine to have a local Git Client to contribute. The Git documentation site has good instructions and videos on how to get started with Git, as well as numerous instructional videos on YouTube to get you going. If you are new to Git, they are a great place to start!
Read The Guides
In addition to installing Git locally, we request that you take a solid look through the following guides. The first guide, Git Tips For Beginners, is a walk through of things that our team has found useful in the past to help get people up and going with their contributions. While this guide is optional, pointing people at this guide has resolved a fair number of questions in the past.
The second guide, our team’s Git Commit Guidelines, is required reading for all contributors. These guidelines document the rules we require every contributor to follow when submitting commits for consideration.
To make things easier for contributors, the repository includes configuration to
use Commitizen for Git commits. Entering git-cz on the command
line within the repository will walk you through a series of prompts to build a commit message
that is fully compliant with our guidelines. It’s usage is highly recommended to avoid issues.
Optional Setup
To assist you in preparing your contributions with minimal friction, you can optionally run one or more pieces of our automated build pipeline on your local machine. Depending on the depth and complexity of your changes, having these present on your local machine are often a time saver in terms of detecting bugs before you submit a Pull Request for your changes.
Choosing to run any of these checks locally will shorten the minimum time required to notice a failure from 3-5 minutes for them to run on the GitHub machines to an average of 60 seconds or less for those same checks to run on your local machine.
Running Pre-Commit Hooks Locally
Facilitating the early detecting of pre-commit hook failures, an option is to install the
Pre-commit tool in your local repository. With the
Pre-commit tool installed, any commits to your local Elegant repository will be subjected
to the same verification that is performed when you submit a
Pull Request for your changes.
This tool integrates with your local repository, so once installed it is automatically
executed as part of your normal git commit process.
Running the Spell Checker Locally
As the dictionary in the environment that you develop changes in may be different than other contributors, the team has elected to include a the yaspeller tool as part of our build pipeline. While this does not integrate with your local repository like the Pre-commit tool, running this locally can help shorten the cycle for ensuring that your spelling is spot on!
Making Your Changes to Elegant
With all of the required, recommended and optional setup behind us, and all of the submitting of the changes ahead of us, it is time to focus on how to develop features for Elegant. To ensure that this topic is given the focus it requires, the article Developing Features For Elegant is dedicated to providing that information to contributors.
Note
While this section rightfully belongs where it is in terms of workflow, it is recommended that you continue reading this article to it’s end. This will allow you to understand what comes after your changes, and may influence implementtion changes to avoid possible problems later on in the workflow.
Submitting a Change For Consideration
Submitting your changes is performed using the GitHub
Pull Request feature. Before
starting the Pull Request, you must push any committed changes from your local repository to
your forked Elegant repository on GitHub. Once that has been done, go to the
Compare Changes page and click on the
compare across forks text right underneath the title.
Across the top of the page, you will see 4 selection drop downs that look like this:

These drop downs allow you to select where to compare changes from and to. Leave the first
selection alone, and unless instructed otherwise, select next from the second selection.
Select the name of your repository fork from the third selection, typically your GitHub account
name followed by /Elegant. Finally, select the branch that your changes are in on the
forked repository in the last selection.
Note
Typically, most people synchronize the branch name of their local repository with the branch name they push to on their forked repository. If you push your local changes to a different branch on your forked repository, select the name of the branch in the last selection.
Once you confirm that the changes that are now visible at the bottom of the page are the ones
you intend to submit, press the Create New Pull Request button. The edit field at the
top of the page must have a name that identifies what the change is and is important to relay
the scope of your change. However, the editor field below it is where most of the required information is.
Currently there are 2 pre-requisites steps and 3 recommended steps as requirements of every
Pull Request. If you have satisfied these requirements, change the [ ] text to [x]
indicating that you have complied with the pre-requisite. Then proceed to the Description at
the bottom and add a description that provides a good amount of information about what you
changed and why. If there were any reported issues that you resolved, it doesn’t hurt to
mention them in this section.
When you are done with adding that information, double check it and press the
Create pull request button to submit the request.
Building Your Changes on the GitHub Server
After pushing the Create pull request button, you are transferred to another page that is
mostly the same as any other GitHub Pull Request page. The main difference is the merge
section near the bottom, where you will see something like the following:
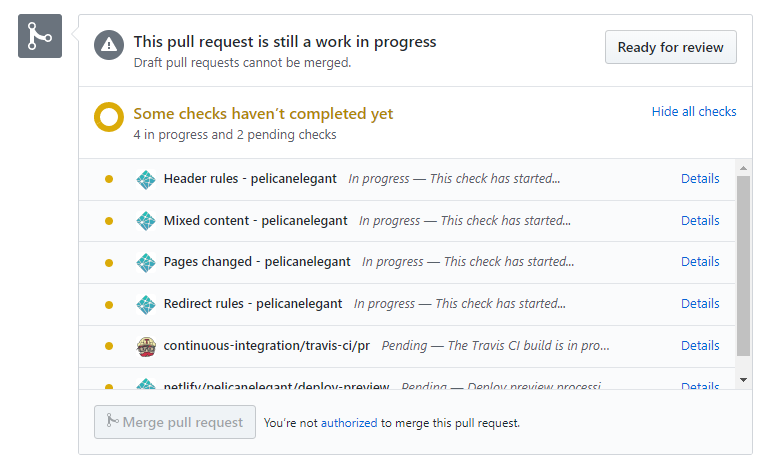
If the build verifies your changes, all 6 of the current checks will either have a grey box
in front of them or a green checkmark. If any of the verifications fail, they will have a
red X in front of the verification that failed. Click on the Details text on the right side
to get more information on why those checks failed.
Build Verification Actions
To ensure each Pull Request contains solid changes, there are 3 sets of verification actions performed on each Pull Request.
The first set of actions are the Header rules,
Mixed content, Pages changed, and Redirect rules which are simple checks with
pre-defined rule sets. These rules employ simple rule sets looking for changes that are
outside the scope of the rest of the project, and rarely fire if you keep to the format
of the other files in the repository.
The next verification action is the Travis CI action that performs a complete build of the
project, represented by the continuous-integration/travis-ci/pr action. A complete build
of the project often takes 3-5 minutes, so this is the verification action you will be
waiting on the longest.
It is this part of the build that puts all of the changes through strict checks to make sure that the submitted changes are solid.
- install pre-requisites for building
- Pre-commit on the project source
- yaspeller on the project source
- publish for the documentation site
- w3c_validator on the documentation site
- html5validator on the documentation site
More information on how our team uses Travis CI is detailed in this article.
Previewing Changes
The final verification action is a simple build and internal deploy of the
Elegant documentation website, represented by the
netlify/pelicanelegant/deploy-preview action. Clicking on the Details text on the
right side of the action will redirect your browser to temporary deployment of the
documentation website deployed using Netlify. If the changes
that your are submitting are documentation changes or have an impact on the look and feel
of Elegant, you should use the preview to manually verify your changes.
Note
The documentation preview is deployed to Netlify without performing a full build as detailed above, and is not dependant on the full build step. As such, you can manually verify your changes on the preview website while the full build is ongoing.
View Previews For Other Pull Requests
This Netlify temporary deployment is also useful tool that can be used to see the effects of any Pull Request on the documentation website. For example, if we want to look at what the effects of Pull Request #458 were, we have a solid path to view those changes.
Each of the
recently close Pull Requests
was built with Netlify support enabled. As such, if you switch from the default
Conversation tab to the Checks tab, you can see if Netlify succeeded. If it did
succeed, there will be a View more details on Netlify link at the bottom of the page
which will take you to the Netlify deployment of the Pull Request. At the top of the
Deploy Log section is a Preview button that will take you to the temporary deployment
of the documentation website, as if you had clicked on the Details link from the
Pull Request page itself.
What Happens If The Build Detects Errors?
Once you fix any errors that the build detected, go through your normal verification process and submit the changes to your forked repository. If your Pull Request is still open, when GitHub detects that one of the repository/branch pairings in a Pull Request has been updated, it will execute any required checks from the beginning. At that point, you are effectively back at the Building Your Changes on the GitHub Server section above.
This looping will continue until one of two things happen: all errors are dealt with OR you
give up. At any point before the Pull Request is accepted and merged with the main
repository, you can push the Close pull request button at the bottom of the page and close
the Pull Request. This will perform a “soft close” on the Pull Request, with the option to
re-open the Pull Request at a later date.
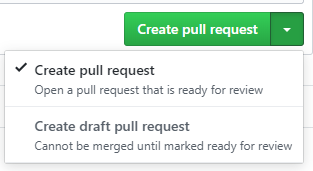
Consider Using a Draft Pull Request
If you want to make sure that your Pull Request builds on the server before submitting it for
consideration by the team, consider using a Draft Pull Request. Instead of pressing the
Create pull request button in the
Building Your Changes on the GitHub Server
section, click on the arrow on the right side of the button and select
Create draft pull request.
A draft request is exactly like a normal Pull Request except that it is not visible to anyone other than yourself. In this way, you can make sure the Pull Request is exactly the way you want it before asking for it to be considered part of the project.
Something that is often forgotten about Pull Requests, and therefore Draft Pull Requests, is that you can edit most of the contents of the Pull Request after you have created it. Use this to your advantage as you get your Pull Request ready!
What Happens If Team Members Ask For Changes?
As we are a team, when changes are submitted for consideration, the team will offer feedback on the changes. The feedback will generally fall into 3 categories: yes, no, or almost.
With the “yes” category, the changes will be accepted “as is” into the project.
Conversely, in the “no” category, the changes are rejected, usually with a decent description of why they were rejected. Depending on the rejection reason, it may be possible to adjust your changes according to feedback in the rejection reason and submit it as a new Pull Request at a later date.
In the “almost” category, the feedback will usually contain specific things that one or more of the team members want to see changed before it can be merged. This feedback can be a simple as a grammar error they want to see fixed, or asking for a more complete article documenting how to use your changes. The important part to note about this category is that the team feels that after the suggested changes have been performed, you can easily move to the “yes” category.
Regardless of what category the feedback for your changes falls into, please remember that we are a team and we are at our best when we work together. If you have a disagreement, ask for clarifications and initiate a conversation to understand where the reviewer of the Pull Request is coming from. Work with that person to help yourself see their viewpoint.